How to quickly gather IP Addresses for a list of Servers

Scenario: You want to quickly gather the IP addresses from a list of HostNames.  Gather your hostnames into a variable and run the following script:

#Gather into your Variable ( I am gathering a list of all Exchange 2010 servers) – You could also Import-CSV or other import types.

$Servers = Get-ExchangeServer ExSvr* | Where AdminDisplayversion -like *14* | Sort Name

#Loop It!  You can also write it out to a file as well by inserting Out-File with -append OR other export types.

$servers | %{
$IP = [System.Net.DNS]::GetHostAddresses($_.Name).IPAddressToString
$Name = $_.Name +":"+$IP
Write-Host $name
}

Rename Volume Labels by Powershell

To bulk rename Volume Labels for disks, use the following Powershell command:

get-ciminstance win32_Volume -filter “Label = ‘Old Label'” | set-ciminstance -Property @{Label =’New Label’}

If these volumes are mount points and you have to change the folder name as well, use the following Powershell command:

Rename-Item C:OldFolderName C:NewFolderName

Script to Purge IIS Logs on Servers

Scenario:  Some applications, such as IIS, will create daily logs on your server. These IIS logs can be big in size and will not automatically purge off.  The script below will purge all but 7 days worth of IIS logs for each server listed in the $servers variable.

PowerShell Script (PurgeIISLogs.ps1)

$servers = “MBX01″,”MBX02”

$servers | %{ 

dir $_c$inetpublogslogfiles -recurse |  Where { ((get-date)-$_.LastWriteTime).days -gt 5 } | Remove-Item -Force

}

To schedule this script to run as a daily task, setup a second script (a batch script) that calls the Powershell script and executes it. The batch script is below.

Batch Script (PurgeIISLogs.bat)

%SystemRoot%system32WindowsPowerShellv1.0powershell.exe -NoProfile -ExecutionPolicy Bypass -Command “& ‘c:TASKPurgeIISLogs.ps1′”

Check for hotfix on multiple computers

Create file c:server_list.txt with a list of the servers to check.
In powershell scripts below: Replace $Patch variable KB2982791with the hotfix your looking for.

2 Files will be created on your desktop.
      Hotfix=Present.log
      Missing=Hotfix.log


Run the following from powershell
$computers = cat C:server_list.txt
$Patch = “KB2982791”
foreach ($computer in $computers)  
{  
if (get-hotfix -id $Patch -ComputerName $computer -ErrorAction 0)  
{  
Add-content “Hotfix is Present in $computer” -path “$env:USERPROFILEDesktopHotfix-Present.log” 
}
Else  
{  
Add-content “Hotfix is not Present in $computer” -path “$env:USERPROFILEDesktopMissing-Hotfix.log”   

}

Reading a Memory .dmp File

Scenario:  A server performed a hard shutdown and restarted. You want to figure out the faulting process that cause this crash.

Steps:

1.  Make sure you have downloaded and installed BlueScreenView and WDK 8 (Windows Driver Kit).

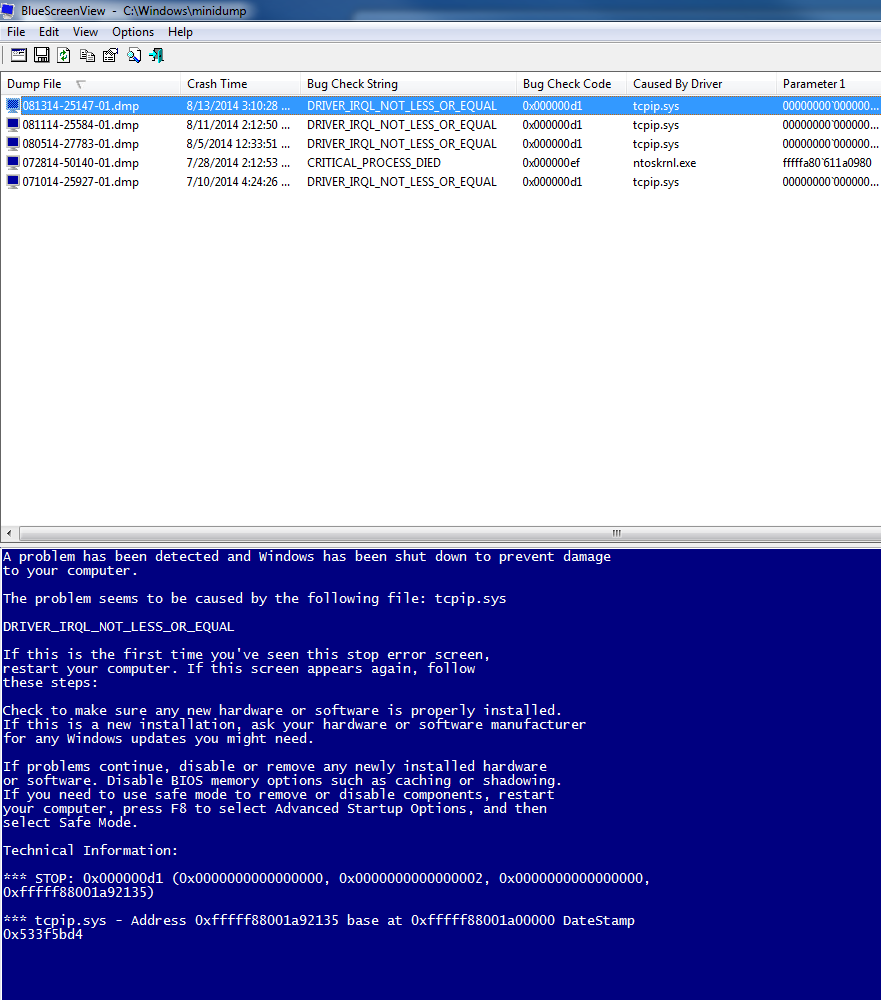
2.  Open BlueScreenView.  If you have copied the dmp files to your computer, make sure you put them in C:windowsminidump folder.

Click on the dmp file and it will tell you what driver caused the blue screen.  You can also change the lower pane mode in the Options menu to see the actual Blue Screen on the server or the drivers in the crash stack. This will give you somewhat of an idea of what caused the crash.


3.  To find more information in the crash dump file, use WDK. Open a Elevated Command Prompt and navigate to the following directory: C:Program Files (x86)Windows Kits8.0Debuggersx64

4.  Copy the Dump file (.dmp) locally. On Server 2012, this is in the %SystemRoot%MiniDump folder.

5. Type the following:

kd –z C:windowsMiniDumpWindowsmemory.dmp

.logopen c:debuglog.txt

.sympath srv*c:symbols*http://msdl.microsoft.com/download/symbols

.reload;!analyze -v;r;kv;lmnt;.logclose;q

6. Review the results by opening c:debuglog.txt.  Search for the Process_Name and other relevant information and it will tell you the faulting processes and information.

Get a list of all the servers with a specific eventid in the eventlog.
Example below is for finding eventid 6008.

$servers = gc C:servers.txt
foreach ($server in $servers)
{
    $events = Get-EventLog -ComputerName $server -LogName “System” | Where-Object {$_.EventID -eq “6008”}
    if ($events -ne $null)
    {
        foreach ($event in $events)
        {
            $time = $event.TimeGenerated
     Write-host $time $server
        }
    }
}

Perform IIS reset on multiple servers at once.

Perform IIS reset on multiple servers at once. Displays status after reset. 
#Specify servers in an array variable, Make sure you change the where statement.
[array]$servers = get-exchangeserver | where {$_.identity -like “esg*” -and $_.AdminDisplayVersion -match “version 15.0*”}

#Step through each server in the array and perform an IISRESET
#Also show IIS service status after the reset has completed

foreach ($server in $servers)
{
    Write-Host “Restarting IIS on server $server…”
    IISRESET $server
    Write-Host “IIS status for server $server”
    IISRESET $server /status
}
Write-Host “IIS has been restarted on all servers”
OR

#Specify servers in an array variable
[array]$servers = “Server1″,”Server2″,”Server3″,”Server4”
#Step through each server in the array and perform an IISRESET
#Also show IIS service status after the reset has completed
foreach ($server in $servers)
{
    Write-Host “Restarting IIS on server $server…”
    IISRESET $server
    Write-Host “IIS status for server $server”
    IISRESET $server /status
}
Write-Host IIS has been restarted on all servers

Disable APIPA Windows 2008 Server

Disable APIPA Windows 2008 Server

Use Registry Editor to create the following registry key:

  1. HKEY_LOCAL_MACHINESYSTEMCurrentControlSetServicesTcpipParameters
  2. Add the following value to this key:
    Value name: IPAutoconfigurationEnabled
    Value type: REG_DWORD
    Value in hexadecimal: 0 (A value of 0 disables APIPA support on this computer)

    NOTE: If the IPAutoconfigurationEnabled entry is not present, a default value of 1 is assumed, which indicates that APIPA is enabled.

  3. After you make this change, restart your computer.

Removing hiberfil.sys to recover space

Issue: In windows vista, 7 or 2008, hiberfil.sys takes up large disk space on your Root drive. The more memory you have, the the larger the file gets
Synopsis: Hiberfil.sys is used to store contents of RAM when the computer hibernates. It’s typically the same size as the the total RAM. It’s a hidden system fileResolution: If you don’t need to hibernate your system, you can safely remove the the file by following these steps: Click Start -> All Programs -> Accessories
Right-click Command Prompt
Select Run as administrator
In this privileged command prompt window, enter: powercfg -h off

Instantly, hiberfil.sys is gone. The space recovery is instant as well